


Using Gmail for your small business makes a lot of sense. It's a secure system. It's free. And it integrates well with other Google tools.
It won't be much use if you don't know how to send Gmail
messages, though. As a small business owner, you need to know how to send
information to others. You need to know how to attach or insert information into your emails when needed. You also need to know how to forward a message you receive or copy
others on a message you are sending.
In this tutorial, we'll explain what you need to know to send your first email with Gmail, including a special section on how to make your Gmail messages more professional. We'll also go over some basic Gmail features that will help you get the most from your Gmail account.
How to Send an Email on Gmail
Watch this quick screencast to learn the basics of how to create and send a new Gmail message quickly:
Or walk-through the detailed written steps below for more information on how to send your first Gmail message.
Step 1: Open Gmail
Start by opening your Gmail inbox. If you haven't already set up your Gmail account, refer to our Quick Start Guide:


Step 2: Create a New Gmail Message
From the open Gmail inbox, click the Compose button in the upper left of the screen.
.jpg)
.jpg)
.jpg)
The New Message form displays.
.jpg)
.jpg)
.jpg)
Before we begin filling out the New Message form, you can maximize it on your screen by clicking the Maximize icon in the upper right corner of the screen (it looks like two diagonal arrows).
Step 3: Fill Out the New Message Form
On the New Message form there are four basic areas to fill out:
- the To field
- the From field
- the Subject field
- the body of the message
There are also links in the upper right corner of the New Message form that allow you to copy others on the message.
1. How Fill Out the To Field
The first field to fill out is the To field.
.jpg)
.jpg)
.jpg)
Type the email address of the individual you want to receive your message. The email address needs to be exact.
2. How to Fill Out the From Field
The From field defaults to the Gmail address you are using to create the message. You cannot change it unless you have combined your email address with other email addresses. For instructions on how to do that, review this tutorial:


3. How to Fill Out the Subject Field
The next field to fill out is the Subject field.
.jpg)
.jpg)
.jpg)
The Subject field is a brief description of the message. It displays in the recipient's inbox before they open the message.
Be careful what you type into the Subject field. Typing an unprofessional subject line or leaving the subject line blank could get your message filtered to your recipient's Spam folder.
4. How to Send Copies on Gmail
You can send a copy of your message to additional recipients. There are two ways to do this:
- By adding Cc recipients. Cc recipients are often added to a message for informational purposes only. For example, if ABC project affects your project you may be a Cc recipient to messages about ABC project even when there is no need for you to respond to those messages.
- By adding Bcc recipients. Bcc stands for blind copy. When you blind copy a recipient onto a message, no one will be able to tell that they are receiving a copy of the message but you and that person.
To activate the Cc
and Bcc options, place your cursor
in the To field. The Cc and Bcc
options appear in the upper right corner of the New Message form.
.jpg)
.jpg)
.jpg)
To open the Cc field, click the Cc option. The Cc field displays below the To field.
.jpg)
.jpg)
.jpg)
Type the email addresses of any individuals you want to receive a copy of the Gmail message into the Cc field.
To open the Bcc field, click the Bcc option. The Bcc field displays below the Cc field.
.jpg)
.jpg)
.jpg)
Type email addresses of any individuals you want to be blind copied onto the Gmail message in the Bcc field.
You are now ready to start building the body of your new Gmail message.
Step 4: Build Your Message
In addition to typing the text of your message, you can control the way your message looks. You can send attachments or even money with your message.
Start by typing the text of your message below the subject line.
.jpg)
.jpg)
.jpg)
As you can see in the example above, I've started to type the text of my status report. However, the message is not complete. I need to add formatting, attach a file from my computer, and embed a URL.
Let's take a look at how to add those elements to the email, and more.
1. How to Incorporate Formatting in Gmail
Gmail's formatting options appear in a menu at the bottom of the New Message form. If they are not visible, click the Formatting options icon (it looks like an underlined Capital A) next to the Send button.
.jpg)
.jpg)
.jpg)
From left to right, the Formatting options are:
- font
- size
- bold
- italic
- underline
- font color
- align font
- numbered list
- bulleted list
- indent less
- indent more
- quote
- remove formatting
To apply a Formatting option place the cursor next to the text you want to format. Drag the cursor across the text to select it. Once your text is selected, click the Formatting option you want to apply to the selected text.
As an example, I'm going to apply bold and bullets to parts of my message. Here's what the formatted Gmail message looks like.
.jpg)
.jpg)
.jpg)
2. How to Attach a File from Your Computer
To attach a file from your computer or from Google Drive, click the Attach files icon (it looks like a paperclip) at the bottom of the New Message form. Windows explorer opens.
.jpg)
.jpg)
.jpg)
Select the file you want to attach to your message. Click the Open button to attach it.
Note: There is an attachment size limit in Gmail. Your attached files cannot have a total size of over 25 MB. That means a single file cannot be over 25 MB in size, or a group of files cannot add up to over 25 MB. Also, you cannot attach files with a .exe extension since this type of file may contain a virus. There are, however, multiple effective methods for sending large files outside of Gmail.
3. How to Insert a Link into Your Gmail Message
You can also insert an email link or a URL into your email message. To insert a link, place your cursor in the text where you want the link to be and click the Insert link icon (it looks like a chain) in the Formatting Options menu. The Edit link box appears:
.jpg)
.jpg)
.jpg)
In the Text to display field, type the text you want to appear over the link.
Next, choose whether the link should be a web address or an email address:
- To choose a web address, click the circle next to Web address and type the URL.
- To choose an email address, click the circle next to Email address and type the email address.
If you want to, you can test the URL address by clicking Test this link.
Click the OK button when you are done. The hyperlink is inserted into your message.
4. How to Add an Emoji to Your Email
To add an emoji to your message, click the Insert emoji icon (it looks like a smiley face) from the Formatting options menu. The Emoji selection box displays.
.jpg)
.jpg)
.jpg)
You can use the scroll bar to the right of the box or the emoji type icons across the top of the box to find more emojis. When you find the emoji you like, click it and it is inserted into your Gmail message.
Tip: Keep in mind professional email guidelines if you're sending a business message, as emoticons can come off as immature in the wrong context.
5. How to Incorporate a Photo into the Message
You can include a photo in the body of your
message. To display the Upload Photos
box, click the Insert Photo icon (it
looks like a camera) on the Formatting
options menu.
.jpg)
.jpg)
.jpg)
There are three ways you can select a photo to insert into your message:
- upload the photo using Drag and Drop from your desktop
- choose the photo through Windows explorer
- use an image URL (web address)
Once you've selected an image, click the Insert button in the lower left corner of the Upload Photos box.
6. How to Send Money
If you have a Google Wallet account, you can even send and request money through Gmail. To access this feature, click the Send and request money icon (it looks like a dollar sign). Follow the prompts on the screen to send or request money.
Note: You cannot use this feature if you are sending the email message to more than one person.
Step 5: Review Your Message
Before you send your new Gmail message you should review it carefully. Make sure that it says what you want it to say and that the information is correct. Gmail also provides a way for you to check spelling errors.
If your message is not quite complete you can save it as a draft. If you decide not to send the message you've created you can save it as a draft as well.
Let's take a look at each of these options.
1. How to Check Spelling in Gmail
To check the spelling in your message, click the down arrow in the lower right corner of the New Message box. The More options submenu displays. Click Check spelling:
.jpg)
.jpg)
.jpg)
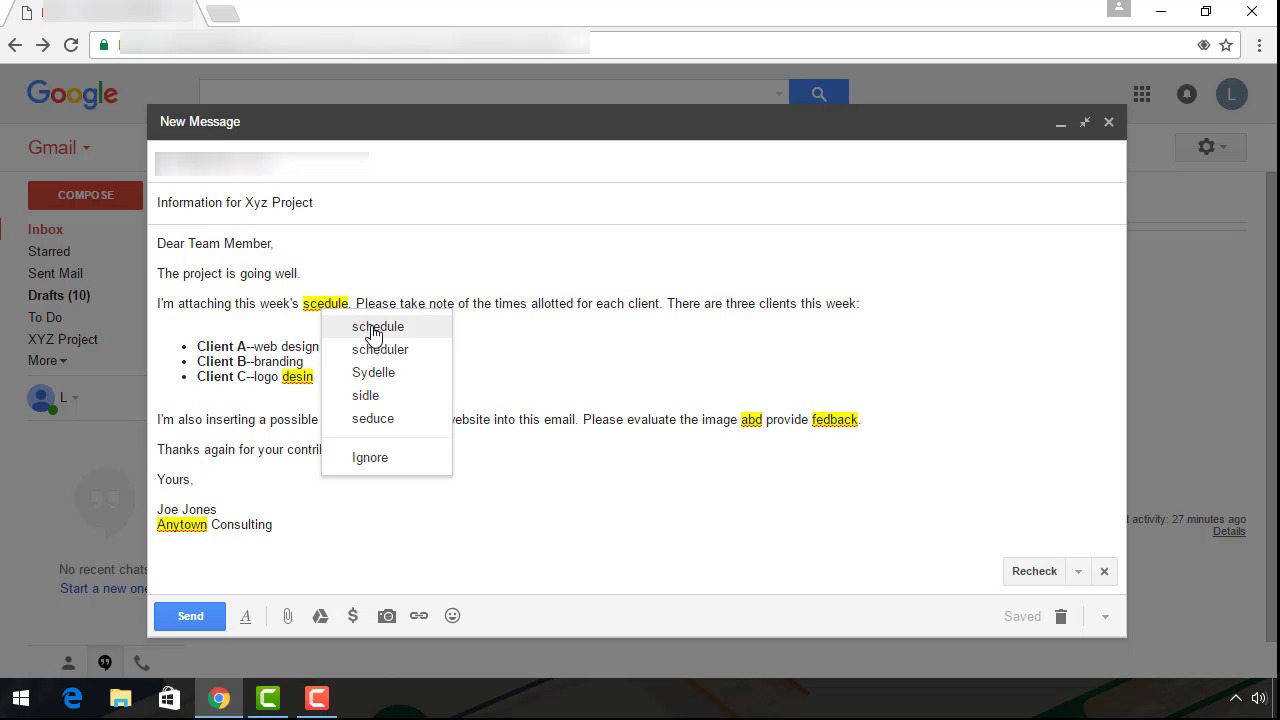
Errors in your message are highlighted in yellow.
.jpg)
.jpg)
.jpg)
Correct your errors. Click the Recheck button after you're done.
How to Save as a Draft in Gmail
It's not difficult to save your message as a draft. Simply click on the X in the upper right corner of the New Message box. Your message is saved in the Drafts folder and the New Message box closes.
How to Discard a Message With Gmail
If you decide to not ever send your new Gmail message, you can discard it. Click the Discard draft (it looks like a trashcan) icon in the lower right corner of the New Message box.
.jpg)
.jpg)
.jpg)
Step 6: Send Your Message in Gmail
You are now ready to send your message.
1. How to Send a Gmail Message
When you are ready, it's not difficult to send your new Gmail message.
.jpg)
.jpg)
.jpg)
Click the Send button in the lower left corner of the New Message box. A message displays notifying you that your message has been sent.
2. How to Forward a Message on Gmail
A variation of sending a message is forwarding a message. You can only forward a message that you have already sent or that you have received. You can find messages you have already sent in your Sent Mail folder.
Open the message you wish to forward. Click the arrow in the right corner of the message.
.jpg)
.jpg)
.jpg)
A drop-down menu displays. Click the Forward option. Type the email address of the person you wish to forward the message to in the To field. Type any additional information you wish to include in the body of the text.
Notice that Gmail adds a header to the original message that includes the email address of the original sender as well as the date and time it was sent.
.jpg)
.jpg)
.jpg)
When you are ready to send the forwarded message, click the Send button in the lower left corner.
3. How to Reply to a Messagein Gmail
A variation of sending a message is replying to a message. You can only reply to a message that you have already sent or that you have received. You can find messages you have already sent in your Sent Mail folder.
.jpg)
.jpg)
.jpg)
Type any additional information you wish to include in the body of the text. Click the Send button in the lower left corner.
Note: Carefully review the original recipients of the message. Unless you manually delete those recipients you do not want to respond to, they will all receive your message reply.
How to Make Your First Gmail Messages More Professional
As a small business person it's important that your emails appear professional. You can learn more about how to write professional emails in these tutorials:

 How to Master Proper Business Email Format - and Avoid Professional Disaster


 How to Start and End a Professional Business Email
Signature templates are another way to make your new Gmail message more professional. A signature template includes crucial contact information as well as your company's logo. Here's is a curated selection of the best email signature templates with tips on how to use them:
You can download your own favorite email signature template designs at our GraphicRiver marketplace, where there are many professional choices to browse through. They can be customized quickly, for a great email signature design.
Conclusion
Email is an important tool your need for your small business. Gmail is a powerful email platform to use for your small business communications.
Once you know how to send an email on Gmail, you're in the driver's seat. You can control who you send messages to, what you attached to your emails, and make sure your messages are professional and on target before sending.


